Litter training a chinchilla is possible, but success depends on your chinchilla’s personality. A chin that likes order in their home will typically be well-receptive to training, whereas the more throw-caution-to-the-wind personalities might not take to litter boxes quite as well. Still, there are a few tips that may help the success of training – the most important of which is the litter box, repetition, and consistency. Of course, the training we’re talking about is for #1 only! 😉

So, while I’m in the process of changing cages (yes, it’s happening and no, I’m not entirely sure how I feel about it yet), I decided to re-imagine my litter boxes. In my custom cages, I had pseudo litter boxes, sectioning off a corner of each cage with pine frames and filling it with chinchilla-safe bedding. My favorite bedding is Eco-Bedding: a safe, recycled bedding that resembles crinkled recycled paper (or, actually, that’s exactly what it is). The chins have been using it for so long that they no longer have any impulse to snack on their bedding. Anyway, I’d decided a while back to construct pine litter boxes in place of the faux box structure, and this is what I came up with!

Step 1: Tools!
- Kiln-dried pine. For each box, I used 2 pieces at 6.5″ x .75″ x 1.5″ and 2 pieces at 8″ x .75″ x 1.5″ – however, any lengths that will form your desired shape (triangle, square, rectangle, etc) will work. Try to make sure the surface area is high in relation to the height, so that it would be very difficult for your chin to flip the box over. Use a jigsaw to cut the wood to your desired lengths.
- Drill & Screws
- Cardboard & Box Cutter
- Staple Gun & Hammer
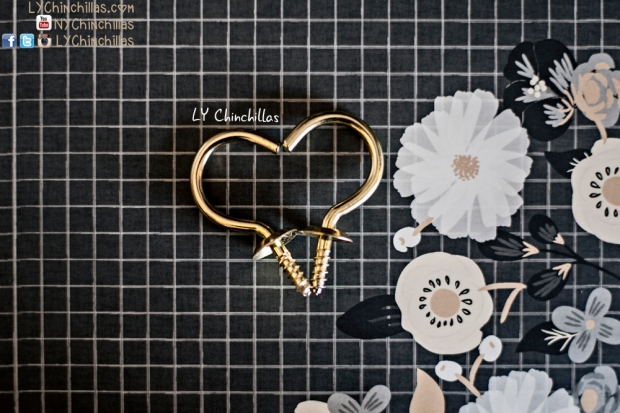
- Eye Hooks / Alternative: Machine Screw, Wing Nut, and Washer

Step 2: Construct!
With a drill, screw your pine pieces together to create your desired shape. It’s best to use a countersink method, which better hides the screws in the wood. After creating your shape, outline the box’s perimeter against a piece of cardboard and use a box cutter to cut the shape out. Use the staple gun to adhere the cardboard to the bottom of your box, using as few staples as possible to achieve a secure bottom. I use one staple in each corner and then hammer them in to make sure they are secure and impossible to remove without a screwdriver and some leverage. Finally, I use a drill to make a small hole on the side(s) of the box and insert the eye hook(s), which keeps the litter box secure to the cage corner. I use potential plurals, because cages can be different and may need more than one hook to stay in place. I have found that one hook works fine in my cages, because the bars are 1″ and the hook width-wise is 1.25″, meaning the hook would have to be turned vertically in order to be removed from the cage. However, an alternative is using a wing nut, washer, and machine screw – a common technique for removable shelving and other chin items.
Step 3: Set Up!
The best way to introduce a litter box is to secure it to a corner of your cage, filling the box halfway with clean bedding and topping it off with soiled bedding. Since chinchillas have excellent sense of smell and smell is tied heavily to memory, the scent of their soiled bedding will encourage them to return to the same place to urinate. Of course, some chins will dig all the bedding out and trample all over it – the best way to move forward is simply to place the bedding back and continue to encourage the use of the box. It may take a few weeks, and it’s possible that it simply may not work for your chins, but the only way to know for sure is to keep going and display consistency as an owner. The cardboard will have to be changed out every 1-2 weeks, but it serves as an absorptive layer that retains scent and reinforces the training – and also tracks progress. Of course, you could use wood as a bottom, but all organic materials will also require changing out over time. To start off and build a new habit, the cardboard is a great and inexpensive way to encourage repeat behavior. A side note: please watch for cardboard ingestion. At the dimensions and with the installation of my litter box, it’s not possible for my chins to flip the box in order to reach the cardboard, but depending on your shape and method of adherence to your cage, cardboard ingestion could be dangerous and lead to blockage.
Step 4: Monitor!
Accidents will happen, that’s expected. When they occur, be sure to clean up the area well enough to remove as much of the scent as possible. Keeping all soiled bedding in the litter box will be the key to eventual success! Of course, there is no one solution for individual chins, but this method has worked for most of my chinchillas, and is continuing to show signs of potential success in the stubborn ones (cough Fifi and Muff). 🙂

Have a great week, all! I’ll be writing about my transition into Ferret Nation cages as soon as I’m able to formulate a solid opinion on the change. 🙂 Cheers!
April 2015 Update: I have switched the cardboard bottoms out with kiln-dried pine! Over time, it became clear to see that the maintenance of cardboard was too frequent to be efficient. Pine will have to be switched out every several months, as opposed to every week with the cardboard bottoms. 🙂

LY Chinchillas Treat Donation
Donate healthy, delicious treats to LY Chinchillas to help keep our content going!
$5.00

Hello ,
May I share your posts in Chinchillas.org and our facebook?
Marianne Sansouci Chinchillas.org SydChilla Chinchillas & Shelter
LikeLiked by 1 person
Of course! No hesitation, feel very free to share 🙂
LikeLiked by 1 person
Hello. I notice you use fleece like we do. Its easy to put there poo in the litter box when you introduce/train them to use it but has do you get the scent of their per in it?
LikeLike